
Recently, when good friend J asked me to bake a birthday cake similar to the rainbow cake, I jumped at the opportunity to do an ombre cake. Since this is the first attempt, I thought I better do a test bake before the actual one.
The cake itself was straightforward, same process as the rainbow cake, just tint the layers with different shades of colour. The only thing to take note is the tinting part, start with a tiny bit of colour and slowly add more if necessary, otherwise the colours will turn out too dark. Flavouring-wise I went for lychee, as my friend had tried vanilla before. Actually I was a little unwilling to use lychee flavouring as it's an essence and not extract (essence is basically concocted using chemicals, whereas extract is pure). I also didn't know it until I was introduced the Nielsen-Massey suite of extracts ranging from vanilla to lemon, to orange and coffee etc. Nielsen-Massey, why you no make lychee extract? Oh well, just a tiny weeny bit of essence should be ok right? After-all, the colourings are also chemical hor? *sigh* next time when I have more time I will try natural dyes perhaps.
For the frosting, instead of using buttercream, I decided to try fresh cream! Fresh cream frosting is extremely tricky in our hot and humid weather; at least buttercream doesn't melt and collapse as fast as fresh cream. But in terms of flavour, I love fresh cream way more than buttercream coz fresh cream is so creamy and light, whereas buttercream feels so greasy and heavy.
So the challenge is really to find ways to stabilize the whipping cream. I insist on using only dairy whipping cream so it adds to the difficulty. Tried using gelatin, but somehow there were tiny lumps of gelatin in the cream, and I disliked the fishy smell very much. In the end I settled for snow powder and mascarpone cheese. The texture of the whipping cream turned out similar to that of buttercream initially but melted at a faster rate, and set at a slower rate in the fridge.
I can imagine myself dying of panic attacks thinking that my cake is starting to melt the moment I handed it over! Maybe I should get a couple of those ice packs to put inside the cake box? Not sure if it helps.
For the decoration, to echo the flavour of the cake, I used canned lychees, and to add some colour, bits of chopped strawberries, blueberries and kiwi.
And tadah! Proudly presenting my Lychee Ombre Cake. Yes, I was certainly quite pleased with my test bake so much so that I started cake whoring! LOL.
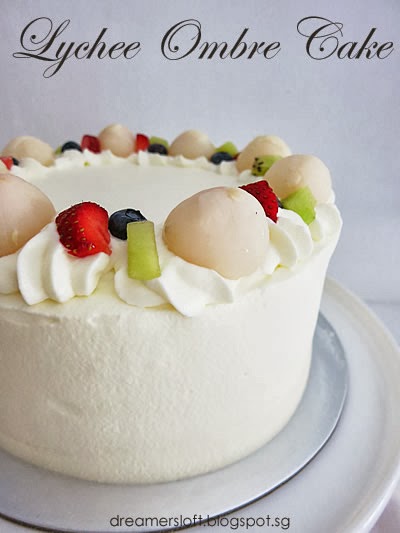

Looks quite pretty on the outside.

Top view.


The cake tasted quite nice as well, not too sweet and texture was soft and moist (not as light and fluffy as chiffon or shortcake though). Paired very well with fresh cream (better than buttercream!). Hubby the
Drop me an email (dreamersloft@gmail.com) if you are interested to order this cake!

(makes one 7" 5 layer cake)
Ingredients
Cake
- 250g cake flour
- 2.5 tsp baking powder
- 1/4 tsp sea salt
- 135g unsalted butter
- 220g caster sugar
- 3 egg whites
- 225g fresh milk
- 1 tsp lychee essence
- Wilton gel colour - yellow, orange, pink
Crumb coat
- 500g dairy whipping cream
- 50g snow powder
- 50g mascarpone cheese
- 500g dairy whipping cream
- 100g snow powder
- 100g mascarpone cheese
- Preheat oven to 175 degree celsius.
- Line baking pans with parchment paper. Alternatively, evenly coat pan with butter, dust with flour and tap away excess flour.
- Sift cake flour, baking powder and salt together. Set aside.
- Cream unsalted butter and caster sugar till light and fluffy.
- Add egg whites gradually.
- Add flour mixture in 3 additions, alternating with the fresh milk.
- Add lychee essence.
- Divide batter into 5 bowls (total weight of batter about 930g, divided into about 175g per bowl).
- Tint the batter using toothpick and gel paste.
- Pour the tinted batter into prepared baking pans.
- Bake at 175 degree celsius for 12-13 mins.
- Let the baking pan cool slightly before removing the cake from the pan.
- Chill the mixer bowl and whisk attachment in the fridge for at least 30 mins.
- Beat the whipping cream, snow powder and mascarpone cheese at medium speed till thick and creamy.
- Place the first cake layer on a cake board, evenly spread some frosting and place the second layer of cake on top. Continue till the last cake layer.
- Crumb coat the cake and put it inside fridge to let it set for at least 30 mins
- Chill the mixer bowl and whisk attachment in the fridge for at least 30 mins.
- Beat the whipping cream, snow powder and mascarpone cheese at medium speed till thick and creamy.
- Spread the frosting evenly on top and around the cake.
- Put the cake back into the fridge for at least 30 mins to let the frosting set.
- Decorate with piped frosting and fruits.
- Put the cake back into the fridge to set.
- Take the cake out from fridge about 10-15 mins before eating.
Hi, I was told that Phoon Huat has this colorless mousse powder that will help to set the fresh cream. This auntie who was buying it said she have been using it for years. Perhaps you could try that? she said 100ml whipping cream to 1 tsp of the powder :)
ReplyDeleteWow! Your lychee ombre cake is really very pretty! The colours are so well spread and the cake deco is really elegant and sweet. *thumbs up*. I just started trying out baking so I am not sure of the tinting technique you mentioned in your recipe. What does it means to "Tint the batter using toothpick and gel paste"? Can you explain abit more? Thanks a lot!
ReplyDeletevery nice M, beautiful even layered and clean cut! the texture looks very nice too.....yumms :)
ReplyDeleteWow, so pretty!
ReplyDeleteHi Elyn,
ReplyDeleteThanks for the great tip! Shall try it out :)
Hi Celine,
ReplyDeleteThanks :) What I meant about the tinting was - use a toothpick, pick up a little bit of colour from the gel paste and dip into the batter. Mix the colour into the batter evenly. If not enough, take another toothpick and repeat. Do it slowly till reach the desired colour tone. If pick up too much gel paste at one go, colour tone might be too dark. Don't double dip using same toothpick or the gel paste will spoil easily (due to contact with batter).
Hi Anita,
ReplyDeleteThanks! I cut the cake when it was cold right out from the fridge, hence the clean cut.
Hi Lisa,
ReplyDeleteThanks :)
Thanks Meg for the great tip!
ReplyDeleteWoah. this looks really awesome :) Can't wait to try it at our next company anniversary for all our staff. - From the team at: aircon-servicing.sg
ReplyDeleteThumbs up for the cake. (: Looks pretty nice and i am sure the taste will be awesome too. Will find one day to order one for our staff birthday.
ReplyDeleteWoah. Awesom cake :))
ReplyDeleteThe cake looks damn nice! Nice decoration. Plan to order this for our next month staff birthday celebration. Feeling excited for it already. haha. Keep up the good work!
ReplyDeleteLooks yummy!! :)
ReplyDeleteCan this cake be kept out of the fridge for say 4 hours. In aircon place?
ReplyDeleteThank you.
Hi Isabelle,
ReplyDeleteThe frosting used is whipping cream which is very delicate and hence doesn't last outdoors (even in air-con place) for more than 30 mins. If intend for long hours outside fridge, better to use buttercream. But that said, real buttercream (using real butter and not margarine or shortening) also difficult to last for 4hrs, maybe 2hrs.
When creamed cakes are placed outside for long time, it may "look" ok but may collapse when cutting.
Thumbs up for the cake. (: Looks pretty nice and i am sure the taste will be awesome too. Will find one day to order one for our staff birthday.
ReplyDelete