
But recently I'm hooked on using the old dough method which I learnt from this recipe book (bought in HK) called Bread of Water-roux, Sponge-dough and Old-dough Method.

The old dough method uses flour, water, sugar, salt and yeast, knead into dough and let it proof for one hour. Thereafter, divide into portions, keep them in zipped bags and then freeze for low temperature fermentation.
Bread made by this method is chewy yet soft, and I love the texture and taste. I find that the texture even improves the next day. It's very convenient as I can prepare a large quantity and just defrost when needed. In our humid weather, it takes 30-45 mins, so by the time I prepare all the baking ingredients, the old dough is ready to use.

Old-Dough
(yields 330g of dough)
Ingredients
Steps
- 200g bread flour
- 3g fine sea salt
- 3g caster sugar
- 3g instant yeast
- 130g water
- Add all the ingredients into a mixing bowl and knead using dough hook until dough leaves the bottom of bowl and is smooth (takes about 15-20 mins).
- Round the dough, and place the dough back to the mixing bowl. Cover the bowl with clingwrap and let the dough proof for 1 hour.
- Divide the dough into rounded portions as required. The total weight of dough is 330g so I divided mine into 3 bags of 50g, 1 bag of 80g and 1 bag of 100g.
- Make sure the bags of dough are sealed properly and store them in freezer. They can keep for 3-4 months.
- Before baking, remove from freezer and defrost for about 30-45mins before use.

So let's start making bread/bun using the old dough method! Here are 2 recipes using 80g and 50g old dough respectively. Proportion of ingredients and steps are about the same, except for the 80g old dough recipe, I added egg for a more chewy texture.

Bread using 80g old-dough | Bread using 50g old dough
(yields about 478g of dough) | (yields about 311g of dough)
Ingredients
Steps
- 200g bread flour > 130g bread flour
- 80g old dough > 50g old dough
- 3g instant yeast > 2g instant yeast
- 30g caster sugar > 20g caster sugar
- 16g milk powder > 10g milk powder
- 100g water > 90g water
- 40g egg
- 25g unsalted butter > 15g unsalted butter
- Add all the ingredients except butter into mixing bowl. Knead using dough hook on medium speed until gluten is formed.
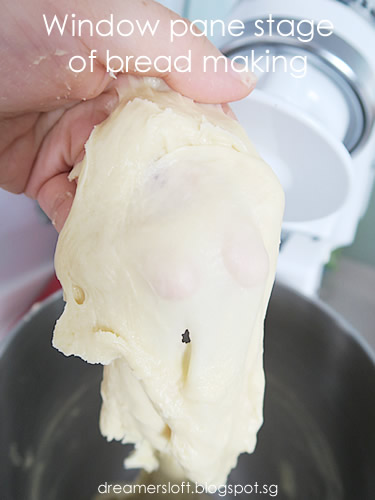
- Add butter and knead until thin membrane stage. Do the window pane test by stretching the dough, it will be almost translucent and not break.
- Round the dough, grease the bowl and place the dough into the bowl. Cover the bowl with clingwrap and let it proof for 45 mins until size doubles. Poke a finger into the middle of the dough, if the hold stays, proofing is completed.
- Place the dough on a kneading mat, knead to remove air from the dough. Divide into number of portions as desired. Usually I will divide into 38-40g for buns with fillings. For mini burger buns, about 30-35g or for regular burger buns, about 50-60g.
- Round the dough portions, cover with cling wrap and let them rest for 10 mins.
- After 10 mins, the dough portions are ready to be used. If making round buns with centre filling like minced luncheon meat or cream, roll the dough into circular disc, place filling in the centre and wrap the dough around the filling. Pinch the dough to seal properly otherwise filling may leak during proofing and baking. If making other shapes like spiral hot dog, roll the dough into a log and twirl it around the hot dog.
- Place the unbaked buns seam facing down into the baking tray lined with Silpat mat or baking parchment.
- Cover with clingwrap and final proofing about 45 mins.
- Bake in a pre-heated oven at 180C for about 13-15 mins.


I adore luncheon meat buns! Must use the Shanghai Maling brand! This is my way of making it, mincing the luncheon meat first before wrapping into the centre of the dough. I remember this is how my old neighbourhood bakery made it when I was still a pre-schooler :) Nowadays, most bakeries use chicken luncheon meat and whole piece instead of mincing. Somehow, it just doesn't taste as good. So from time to time I would make this very nostalgic luncheon meat bun for myself (hb and kiddo also likes it).
Have made several batches of bread using old-dough method now, I can go on and on, but this post is getting too long.
Stay tuned for upcoming posts, I will share recipe for cream cheese custard bun, as well as cafe-style gourmet burgers (the bread are using old-dough method as well).
No comments:
Post a Comment